About Me

My photo
It's All About the Baking came about because I want to share my Gluten-free baking. I've developed recipes and tricks over the past ten years so I could enjoy old favorites that tasted, well, just like the old favorites! Hundreds of experiments and tastings (including and especially friends who can eat gluten) later, I'm ready to share!

Tuesday, May 5, 2015

Zucocoa Cake

Cooling
Recently, in clearing out the fridge while preparing to leave on a short vacation, I had two, lonely zucchini that had not made it onto a dinner menu. Since I was having several friends for a quick dinner gathering, I thought Zucocoa cake would be the perfect dessert.

This recipe began as a sheet-cake recipe from a friend who described it as an old, hippie recipe. I changed the ratio of flour and cocoa to make it a true cocoa cake. You could add chopped nuts or even chopped, dried cherries, but I prefer it just the way it is.

For this gathering I glazed the cake with dark-chocolate ganache. It's such a delicious way to top off a cake, though this cake is perfectly fine plain, and even makes a better breakfast pastry without the glaze.

If you're sharing with someone who is averse to vegetables, peel the zucchini first to remove any evidence green and shred it so the vegetable melts into the cake.

Though I have not done it, I think this recipe would work in two medium loaf pans or a 9x13 sheet pan. Adjust baking time if using a sheet pan; it will take a few minutes longer to completely bake in the center.

UPDATE! I'm including photos of shredded zucchini because it's easier to shred than to chop finely into uniform pieces. That's about all the updating, Enjoy!

Notes*

Grease and flour (I use cocoa instead of flour) a Bundt pan. Set aside.
Greased pan, floured with cocoa
Preheat oven to 350 degrees

Sift together:
2 1/4 cups flour (I used sorghum, use your favorite GF flour or flour blend)
1/2 c cocoa
1 1/2 tsp xanthan or guar gum or 1 TB psyllium seed husk powder
1 1/2 tsp baking powder
1/2 tsp baking soda
1/2 tsp salt
1 tsp cinnamon
1/2 tsp ground cloves


Finely chopped zucchini
Process and reserve 2 cup finely chopped zucchini or 1 3/4 cup shredded zucchini, (blotted with a towel if you've shredded it ) to remove some moisture.*

Cream together without over beating:
1/2 cup butter, softened to room temp
1/2 cup shortening (I use Spectrum organic; 96 grams equals 1/2 cup if you have a scale)
1 3/4 cups sugar
Add and mix thoroughly:
2 large eggs
1/2 cup soured, whole milk,* buttermilk, or yogurt thinned with milk or water
1 tsp vanilla extract

Mix or stir the dry ingredients into the butter/egg/milk mixture, stopping to scrape down the sides and bottom of the bowl two or three times.
Stir the chopped or shredded zucchini into the batter. Spoon the batter into the prepared Bundt pan.

Bake for 50 to 60 minutes (checking at 50 minutes) depending on your oven.


Cool in the pan for ten minutes, then invert onto a cooling rack.
Cool completely before serving.

Glaze, from Epicurious:
1/2 cup whipping cream
1/2 cup corn syrup, preferably dark
9 ounces of bittersweet or semisweet chocolate, finely chopped
In a small saucepan, over medium heat, bring the whipping cream and corn syrup to a simmer but not a boil. Pour over the chopped chocolate and whisk until combined. Glazing works best if you can chill the cake thoroughly first. Not everyone can make room in their fridge, but the glaze won't slide off the cake if it's cold. If there's no room in the fridge, scoop up the glaze with each slice and enjoy!


*Shredding the zucchini will give you a more moist, denser cake.
*To make sour milk put 2 tsp vinegar (white or cider) into a measuring cup and fill to half cup with whole milk. Let sit for a few minutes.
*The Kitchen offers a great tutorial for ganache. For a quick glaze, chop 3 ounces of bittersweet chocolate and put in a bowl. Heat 1/2 cup cream (I got away with half and half, all I had at the time) till it just begins to simmer. Pour over chopped chocolate, let it stand till chocolate is soft, and stir or whisk to blend. To make it thinner, add warm cream a little at a time. Drizzle over completely cooled cake.
Shredded, draining on towel
Lovely batter


The shredded zucchini makes a smoother, slightly creamier, batter. It's just a great cake either way.

Sunday, April 26, 2015

Brie and Jam Muffins


If you only ever make one recipe from my collection, this should be it. When I bit into this warm, decadent muffin, I knew it was a winner. Sweet and salty, flavors of both the jam and the cheese distinct, all I wanted was another. And another. Reviews from co-diners were positive. I'm keeping myself from baking another batch today because I'll just want to eat them. It's best to make a batch and share with friends, they're  delicious with a pot of Darjeeling tea. (And they reheat beautifully, too, 325 degree oven for ten minutes..)
If you want me to convert the recipe to wheat flour, leave a comment and I'll post the changes.

Sift or stir together and set aside:
1 3/4 cups sorghum flour
1/3 cup sugar
2 tsp baking powder
1/2 tsp baking soda
1/2 tsp salt
3/4 tsp xanthan gum
1/8 tsp ground nutmeg, optional

Combine:
2 large eggs, lightly beaten
3/4 c plain, whole-milk yogurt
1/3 cup vegetable oil or melted butter
Brie in batter
1 tsp vanilla extract

Reserve:
Apricot jam
Cold brie cut into approximately 3/8 inch chunks. You'll need a dozen pieces, one for each muffin.

Make a well in the dry ingredients. Stir the liquid ingredients into the dry ingredients, combining thoroughly, scraping down the bottom and sides of bowl. Cover the bowl with a plate and let rest for half an hour. This allows the flour to absorb the moisture and the muffins will rise better.
Jam and brie in batter

Stir the batter down. Fill ten muffin cups about 1/3 full, then push a chunk of brie into the each portion of batter. Spoon a scant teaspoon of jam on top of the cheese. Divide the rest of the batter between the cups to top the muffins, making sure to seal the cheese and jam as completely as possible. (Otherwise it will run out of the muffin.) Bake at 400 degrees for 20 - 25 minutes, mine were done at 23. Some of the filling will inevitably leak out; it's fine, the muffins will still be perfect.
Hot out of the oven, a bit of jam
has leaked and burned on the
pan. It's just fine!


Saturday, April 11, 2015

Fruit Crunch


Ready to serve
When I was little my mother had a friend who was about the right age to be her mother. Her name was Alice and we called her Auntie Alice, or more specifically, "Annie" Alice. I didn't realize it then but she was an unusual and amazing woman. She was vegetarian though we didn't know that word. We just knew she didn't eat any animals. In the winter she would ignore the mice in her dining room claiming that they had to eat, too. Deer grazed in front of her little cabin where she let the apples fall from the tree for them. She invited me to spend the night once when I was about six and we foraged for dinner; we found mushrooms, watercress, berries, and something that I always thought was milkweed pod, which was floured and fried in butter. I don't remember if it was the right time of year to pick milkweed pods but don't know what else they could have been. It was an unforgettable evening, from walking in the woods behind her little house, picking watercress by the stream, to smelling the mushrooms frying up in butter. We had the berries with cream and sugar, then watched the deer family quietly graze in front of the house.
For the topping

This recipe came from her. I've never shared it with anyone before. I'm sure it's something old fashioned and common yet I've never seen it served other than in our family. It's not a fruit "crisp." There are no oats or nuts in it. While baking, it forms a lumpy, hard, top crust with a soft, cakey layer underneath. It's heaven in a baking dish. And there was no time for a nice photo of it plated; another time!

 I used frozen peaches which were delicious but don't don't hold up well as far as texture is concerned. My mom always made it with apple slices and I will say that it's my favorite. But fresh peaches blanketed by this buttery goodness are wonderful, too. Or fresh, Michigan, sour cherries!

This version is specifically for gluten-free flour. If you need the gluten-full version, leave a comment. You may be the first person I share that version with!

Fruit Ingredients: About
3 pounds of apples or peaches, 7 or 8 of either, sliced into approximate quarters. If you use cherries or berries, I'd use about 1 1/2 times the amount you'd need for a pie. Combine fruit with
1/2 to 1 cup of sugar and about
1 1/2 Tb corn starch.
These are not precise amounts but should be a good starting point. (And I always say that if you have good ingredients you'll have a delicious, if imperfect, dessert. If it's soupy, vanilla ice cream saves the day.)

Grease or butter a 9x13 pan or one of equivalent size. The oval baker pictured just fits inside my 9x13 pan. You can always add a few more slices or pluck them out. You want the pan full since the fruit will cook down.

Topping:
Stirring dry ingredients
3/4 cup of your favorite GF flour. I use sorghum for this. It's a healthy flour and only adds to the flavor.
3/4 cup sugar
1 1/2 tsp baking powder
1/2 tsp xanthan gum or guar gum
1/2 tsp salt
1 large egg
6 TB melted butter
cinnamon-sugar
The "crumble"

Put the fruit that has been tossed with the sugar and cornstarch in the baking dish. (I usually bake this naked fruit mixture half an hour or so until hot through out and then pull it out of the oven and finish.)

Stir together the dry ingredients.
Break the egg into the dry ingredients and stir with a fork to combine. It will be crumbly. Use your hands if you don't mind getting messy.

Sprinkle the dry ingredient/egg mixture over the fruit. Drizzle the melted butter over the top. If using a slightly smaller baking dish, reduce the butter a bit. Sprinkle the cinnamon sugar over the topping.

Bake at 350 degrees for about 35-40 minutes, longer if you haven't pre-baked the fruit. This is best eaten the same day. Let it cool, at least a bit, before serving. Oh, I also made home made vanilla ice cream. Enough said.
Grandma's recipe
Almost ready for the oven


Friday, April 3, 2015

Mexican Chocolate Brownies

 
 I'm taking dessert to an Easter Sunday potluck. One co-diner prefers fruit desserts and another, chocolate. These brownies are for the chocolate lover. They have a hint of cinnamon and cayenne pepper, and just a little espresso powder to deepen the flavor. We'll eat them with home-made vanilla ice cream; does it get better than this?

please see notes at end

Melt together in top of a double boiler:
8 TB unsalted butter
4 ounces unsweetened chocolate
1 tsp espresso powder dissolved in 1 TB boiling water

Whisk to combine above ingredients, cool until comfortable to the touch.
When cool, stir in:
1 cup sugar
2 large eggs, beaten

Sift together:
Whisking eggs and sugar into cooled
chocolate mixture
2/3 cup your favorite GF flour (I just used sorghum flour)
1 1/2 tsp baking powder
1 tsp xanthan gum
1/2 tsp salt
1/2 to 1 tsp cinnamon
cayenne pepper, from a pinch to 1/8 tsp, or more if you're brave

1/2 cup toasted pecans, chopped

Add the nuts to the dry ingredients. Stir the dry ingredients into the chocolate mixture, combining thoroughly.
Toasting the pecans
Pour into a greased and floured (I dust with cocoa powder instead of flour) 8 inch square baking pan, smooth the top, and bake at 350 for 25 minutes. Check sooner than that, don't over bake. Cool completely before serving. I know, this is hard, but they really are better when cool. And I've found that the flavor develops after a few hours. They'll be good tomorrow, too!

I added 1/2 cup of toasted, chopped pecans. Walnuts would be great but I was out. Best when eaten fresh, they won't last long anyway!
Cooling; patience!


notes:  You  may omit the cinnamon and cayenne if you wish and make a traditional brownie. Nuts are also optional. You may skip toasting the nuts but I like the subtle difference in flavor it makes.
If you want a non-GF version of these brownies, leave a comment and I'll post the instructions.


Wednesday, December 3, 2014

Not Your Usual Pancakes


On the griddle
Ever have a craving, a feeling that you need a particular food? We'd been talking about having pancakes for several days but with the abundance of lovely carbs at Thanksgiving, and in anticipation of a wonderful assortment of Christmas cookies, we tried putting it off. I had  been planning on trying a recipe with more protein, so the use of almond flour in these pancakes surely lifted them from the realm of pure carbohydrates. Right? One can only put off this type of need for so long, and these wonderful pancakes did the trick. The finished product surprised me by it's lightness! The almond flour lent a bit of sweetness and just a hint of flavor, a very pleasing mix of ingredients. The texture was good, a bit crispy on the outside, probably due to the millet flour I added, and light and moist on the inside. Really, you can't go wrong with these!

(If you're truly in a rush, just use 1 1/4 cups of your favorite gluten-free flour mix. But, please, try these as written sometime soon. They're not much more hassle and the taste will be worth it!)

Preheat and grease your griddle or large, cast-iron skillet. (I use Spectrum shortening for this step.) If several of you are sitting down to breakfast at once, preheat your oven to 200 degrees and as the pancakes are done, slip them into the oven to keep warm. I put a wire cooling rack on a cookie sheet and transfer the cooked pancakes there to await serving.

Sift or whisk together:
2/3 cup sorghum flour or your preferred GF flour/mix
1/3 almond flour or meal
1/4 millet flour or your preferred GF flour/mix
1 TB baking powder
1/2 tsp baking soda
1/8 tsp or pinch ground nutmeg
1/2 tsp salt
1 TB sugar
3/4 tsp xanthan or guar gum, or psyllium seed husk powder

Beat together:
Dig in!
2 eggs, beaten
1/2 cup whole milk yogurt combined with 1/2 cup whole milk
   or 1 cup buttermilk
2 TB vegetable oil
1 tsp vanilla extract

Stir the wet ingredients into the dry ingredients and stir thoroughly to combine. Mixture should be a bit lumpy; don't worry if it is or isn't.

When the griddle is hot (drops of water should sizzle when sprinkled), drop a big spoonful or two onto the hot griddle for each pancake. After two to three minutes, check for bubbles to appear in the pancakes or gently lift an edge to check for browning. Carefully turn the pancakes over taking being sure not to mash them down; you want them to stay light and fluffy! After a couple of minutes, push lightly on the middle. If it springs back, it's done. You may also check to see how brown they are on the bottom but the touch test is most accurate.

Since there were just two of us eating this particular morning, I made three for each of us then put the remainder of the batter in a glass jar, stored it in the fridge, and finished them off a few days later. At this point the batter will need just a bit of thinning with milk or water, but will be as delicious as the first day.

Serve with warm, pure maple syrup or fruit compote. I'm smiling at how much you'll enjoy the first bite!

Sunday, November 23, 2014

Cocoa-date Muffins

Let's eat!
  This time of year I think of spices reminiscent of the holidays, foods richly layered with flavors. These muffins have been forming in the back of my mind for the past couple of weeks, and with the anticipated arrival of a friend for tea this afternoon, it was time to get serious. Though cocoa powder is a key ingredient, these are not chocolate muffins. Not overly sweet, they have a deep, rich flavor. Tea anyone?

Sift or whisk together:
1 2/3 cups gluten-free flour*
1/3 cup cocoa powder
1 TB baking powder
1/2 tsp baking soda
1/2 tsp salt
1 tsp ground cinnamon
1 tsp xanthan gum
1/8 tsp ground nutmeg
1/2 cup dates, chopped
Sifting dry ingredients


Beat together:
1/2 cup sugar
1/3 cup vegetable oil
1/2 cup plain whole-milk yogurt
3 large eggs, beaten
1 tsp espresso powder dissolved in 2 TB hot water or 2 TB water
1 tsp vanilla extract

Mixing dry and wet ingredients

Pour the combined liquid ingredients into the dry ingredients. Stir thoroughly scraping the bowl down; a silicone spatula does the job efficiently. Once combined, cover the bowl of batter (which will be very thick and dough-like) with plastic wrap or a clean plate and let sit on the counter at room temp for half an hour. Letting the dough rest allows the flours to absorb the liquid and the oil, You'll get a good rise in the oven, too.

In the meantime, preheat oven to 375 degrees. Grease, or line with muffin papers, 12 muffin cups. Divide batter between the cups and bake for 18 to 20 minutes until done. If your oven heats unevenly, rotate the pan at the ten-minute mark. Cool in pan on wire rack for ten minutes then serve. Once muffins have cooled, seal in a plastic zipper bag. If you won't be using them within a day or so, double wrap them and freeze.

Ready to be served


These tender muffins brought smiles all around!

** ATK flour blend:
24 ounces (4 1/2 cups plus 1/3 cup white rice flour
7 1/2 ounces (1 2/3 cups) brown rice flour
7 ounces (3/4 cup) potato starch
3/4 ounce (3 TB) nonfat milk powder
If you want to understand the science behind why this works, please buy the ATK cookbook.

Saturday, September 27, 2014

Lake Garda Apple Cake

Fresh from the oven!
I've been making this lovely cake for more than 20 years. It was one of the first recipes I converted to Gluten-free and I was delighted at how perfectly it turned out. It had already gone through a few iterations before the big jump to Gluten-free, and it's often the first recipe I turn to in autumn when the new crop of apples comes in. If you're looking for a lighter dessert to end a meal, this is the perfect choice. If you want a cake to serve with afternoon tea, this is it. if you prefer to start the day with something a little sweet, make this recipe! In all the times I've served it from my kitchen, it's never failed to please.

The recipe from which this cake was adapted calls for Golden Delicious apples and my first cakes were perfect with them. You need an apple that softens and bakes with the batter, that is fork tender when cutting into the cake. Over the past few years I've had less success with the Golden Delicious variety. I don't know what's changed, whether it's the apples themselves, the shipping and storage they go through, or something else, but they do not soften sufficiently. This resulted in apples that are tough and a cake that got mashed when cutting into it. In this particular cake I used an early variety of Transparent apples. They softened to just the right texture. If you have good experience baking with a particular apple variety, please use it and please let me know which one you use.

Separating the eggs and whipping the whites gives the finished cake a bit more height and lightness. If you're pressed for time you may skip this step, add the eggs to the combined wet ingredients, and the cake will still be delicious. And pretty! In this recipe I've used the America's Test Kitchen gluten-free flour mixture using Anson Mills Carolina Gold Rice Flour. Feel free to use the flour of your choice. For years I've been making it with sorghum flour with great success. Using a little corn flour or finely ground cornmeal gives it a pleasing flavor profile, too. 

Let me know how yours turns out!

Lake Garda Apple Cake

8 TB softened butter
3/4  Sugar
3 TB whole milk or cream
1 tsp vanilla
Grated zest of one lemon

1 1/2 cups Gluten-free flour (please see note at end)
1 tsp baking powder
1 tsp psyllium seed husk (guar gum or xanthan gum may be substituted)
1/2 tsp salt

4 large eggs, separated, whites whipped to soft peaks
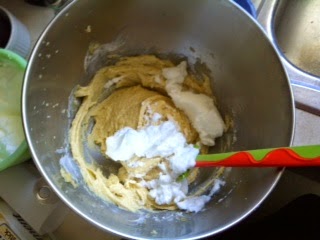
Folding the egg whits with a silicone spatula

Mix together and reserve:
4 TB sugar
1 tsp cinnamon

3 Golden Delicious or Transparent apples, peeled, cored, and sliced into 16 thin slices. Combine with half of the cinnamon
sugar mixture.

Directions:
Preheat oven to 350 degrees. Place rack in upper half
of oven.

Grease bottom and sides of a 9 inch spring form pan.
Cut parchment to fit bottom of pan and grease and flour it.
Preparing the pan

In a stand mixer fitted with a paddle (or by hand)
cream the first five ingredients. Add the egg yolks. Set aside.

Whisk or sift together the flour, baking powder, psyllium seed husk, and salt. Add these dry ingredients to the butter/sugar mixture scraping down the sides and bottom of the bowl once. Remove the paddle if using stand mixture and fold in one third of the egg whites with a spatula. When blended in, fold in the rest of the whites until no white streaks or pieces are visible.

Ready for the oven!


Scrape batter into prepared pan, smooth top just a bit. Place apples in concentric rings on top of cake and sprinkle remaining cinnamon sugar over apples. Bake in preheated oven for about an hour, checking at 50 minutes. The top should be a deep golden brown and spring back when pressed lightly. In my oven, it's done in about 55 minutes. Cool on a rack in the pan for five minutes, loosen the side with a sharp knife and then remove side of spring form pan. Cool completely and slip off-set spatula between the cake and parchment and move to serving plate with a large pancake turner.
Why, yes, I will have a slice!


Notes:
* ATK flour blend:
24 ounces (4 1/2 cups plus 1/3 cup white rice flour
7 1/2 ounces (1 2/3 cups) brown rice flour
7 ounces (3/4 cup) potato starch
3/4 ounce (3 TB) nonfat milk powder
If you want to understand the science behind why this works, please buy the ATK cookbook. Having said that, I use only Anson Mills Carolina Gold Rice Flour for both types of rice flour in this formula. Anson Mills is a wonderful company and deserves to be supported, and this flour makes the absolutely best baked good.